RV Solar — A Complete Guide
RV ownership is more popular than ever, and adventurous campers are going further off–grid to explore remote locations. However, taking along the conveniences of home, such as heating, refrigeration, and personal electronics, can drain RV batteries in a hurry. In response, many RVers are installing solar solutions to go further off–grid for longer while preserving battery health and cutting operating costs.
In this guide, we’ll discuss the benefits of RV solar solutions, how to choose solar panels, batteries, and other RV solar components, and provide installation and maintenance tips.
Table of Contents
The Benefits of Solar Power for RVs
RVing gives you the freedom to explore distant, uncharted paths or simply get away for a few days. Adding solar power to your RV offers many ways to enhance your experience:
Go anywhere. In the past, many RVers were limited by the
availability of campgrounds and shore power. Today, well–
designed off–grid solar systems allow RV operators to go without external power for much longer and trade campgrounds for untouched landscapes.
Lower costs. Many RV operators use portable generators to
charge batteries while off–grid. Gasoline generators and solar
systems both require an upfront investment, but running costs for solar are minimal compared to operating a generator. Solar solutions can also preserve and extend RV battery life by up to 50%, reducing replacement frequency and costs.
Less noise. Running a generator can interrupt your peaceful
setting and won’t endear you to your camping neighbors.
Generator use may also be restricted or regulated in some
locations.
Fewer emissions. Most RV operators are environmentally–
minded, and solar systems are more earth–friendly than generator power options.
Solar Panels — What You Need to Know
Solar panels are the backbone of your RV solar system. Choosing the right panels for your needs will maximize your solar system’s efficiency, performance, and return on investment.
Solar panels consist of multiple individual solar cells that convert sunlight into energy. Several panels can be joined together to create a ‘solar array’ that generates more power. The solar panels generate direct current (DC) electricity used to recharge the RV batteries.
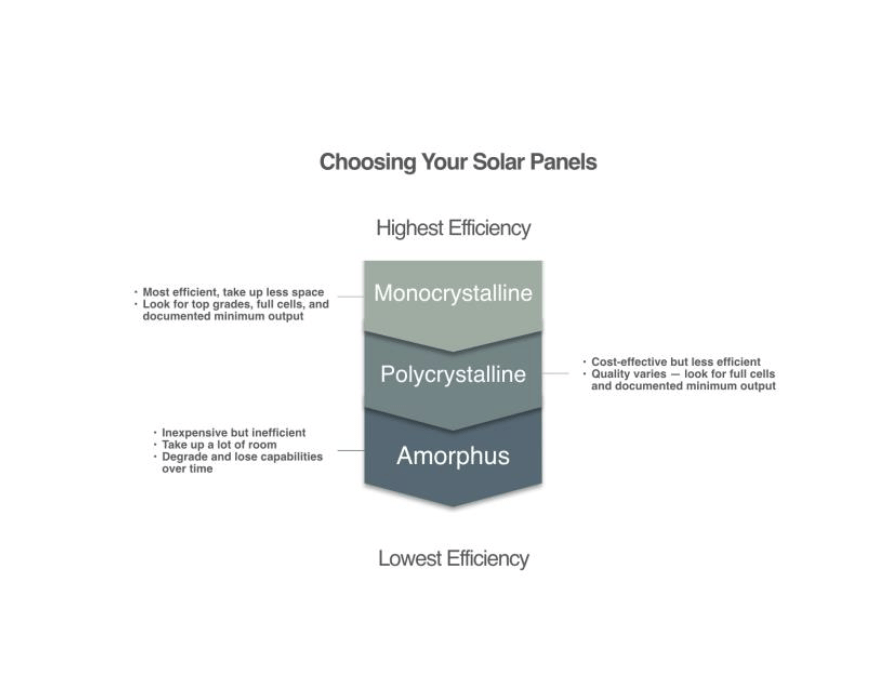
There are three types of solar panels commonly used in RV applications, each with its own benefits and drawbacks:
Amorphous panels are older solar panels and are often found in first–generation RV installations. While inexpensive, they are fragile, inefficient, and take up the most room. They also degrade quickly when exposed to sunlight and can lose up to 30 percent of their power–generating capabilities in their first year of service. Today, amorphous panels are not widely used in new RV applications.
Polycrystalline panels are more robust than their amorphous
counterparts. They require half the space to produce the same power; however, polycrystalline panels can vary widely in quality and performance.
Monocrystalline panels are considered the most efficient RV
solar panels, with energy efficiency rates typically in the 15–20 percent range. They perform better in high heat and low light environments, making them more versatile for RV operators. While more expensive than polycrystalline options,
monocrystalline panels are more durable and typically last longer.
Rigid Versus Flexible Panels
Rigid solar panels, built using a frame surrounding tempered glass covering the solar cells, are the most common option for RVs. Flexible panels, in contrast, have the collecting material embedded into a thin mylar film affixed to an aluminum substrate.
Rigid panels are very durable and typically have longer warranty periods than flexible panels. While flexible versions may be up to 80 percent lighter, they are much more susceptible to damage. Flexible panels are usually reserved for specialty applications; for example, when panels need to be molded to curved surfaces or accommodate height or weight constraints.
Solar Panel Buying Tips
- Cheap solar panels are usually constructed with a lot of cut cells—they may be less expensive, but they’re also less efficient. Full, complete solar cells perform better and are worth the additional cost.
- Look for panels with the highest rated wattage for their size. A smaller footprint means a more efficient panel.
- Watch out for manufacturer claims of wattage output. The best manufacturers will provide a minimum output for their panels, as opposed to a maximum. Always ask your seller to document their panel output range (plus/minus percent).
Solar Panel Installation Tips
Panel placement. Solar panels should be located where they’ll
receive the most light. Many operators will back into campsites, so they’ll receive more shade at the rear of the RV. Panels should also be mounted away from potential shade areas caused by the RV roof and air conditioning units.
Panel mounting. Rigid panels will come with screws and
mounting brackets. After starting the screws, a self–leveling and sealing compound like Dicor can be inserted under each bracket to ensure a level install and a tight panel seal.
There are several ways to install flex panels. One of the most
effective is by using 3M double–sided tape. Other installers opt for a silica flex adhesive, which also works well.
Panel wiring. Once the panels are mounted, you’ll need to run
the panel wires down into the RV. If the RV is not solar–ready, one method is to feed the wires through the refrigerator roof vent. An alternative is to use a cable entry plate. The plate can be mounted anywhere on the RV roof and provides greater flexibility no matter where the solar controller is installed.
RVs prewired for solar already have the cable entry plate pre–
installed, which can dramatically reduce wiring time and
complexity
Battery Basics
RVs use deep cycle, valve–regulated lead–acid (VRLA) batteries that can be regularly discharged and recharged. There are two common types of VRLA batteries— gel and absorbed glass mat (AGM)—with the latter being more popular. A third battery type — lithium–ion — is quickly gaining
popularity in the RV community based on its efficiency, performance, and longevity.
Gel batteries are based on older technology. While they are sealed and do not spill, they charge more slowly than other battery types and require a compatible charge controller.
- An extended lifespan of up to ten years versus three years for traditional lead–acid batteries
- Weight savings of up to 65 percent
- Zero maintenance
- Safer to store. Lithium-ion batteries don’t vent potentially
dangerous gases and can be stored in enclosed locations - Greater discharge depth. Lithium-ion batteries can be
discharged greater than 80 percent without ill effects - Faster charging and better discharge efficiency. Lithium-ion batteries can be charged and discharged much faster than lead-acid batteries.
Battery Buying Tips
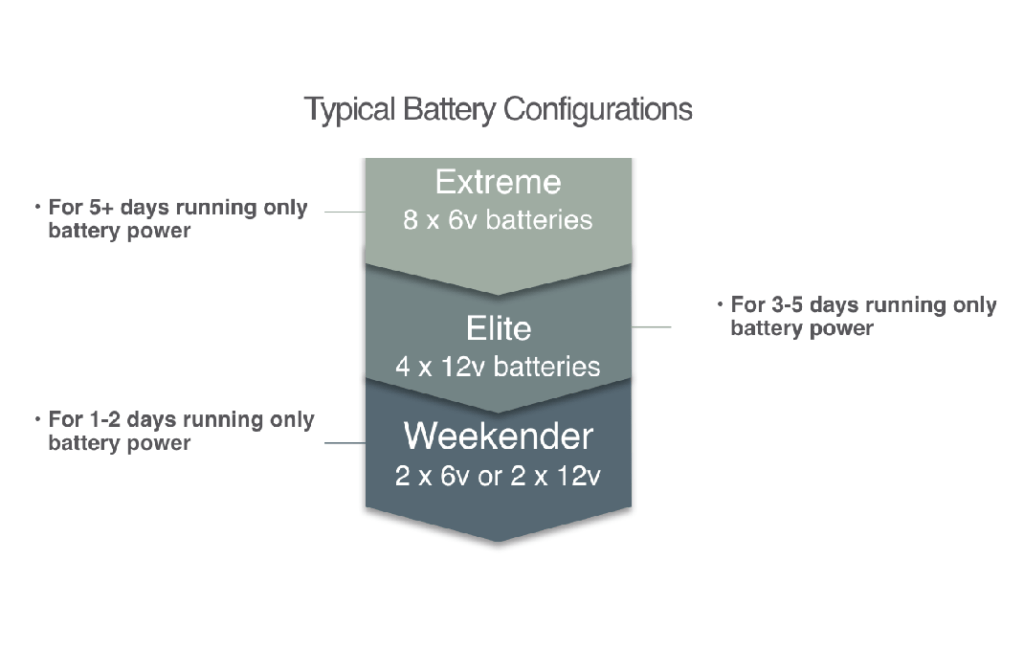
How many batteries will I need? Your battery requirements are based on the energy consumption of your RV. The more appliances you plan to run, the higher your consumption. RV batteries can also be wired together to form a ‘battery bank,’ providing either higher voltage (wired in series) or greater capacity (connected in parallel).
What type of batteries should I purchase? For most off–grid applications, high–quality AGM batteries strike an excellent balance between performance and price. As lithium–ion prices drop, they may offer a better alternative for demanding RV applications.
Heavier is usually better. With traditional AGM batteries, more lead equals more battery capacity.
Troubleshooting Your Battery Installation
If your RV batteries aren’t providing an adequate charge, the first thing to check is the interconnect cables between each battery. Often do–it–yourself installers will use thin, ten gauge wire for the interconnects. These cables should be a minimum of four gauge wire (and preferably two gauge).
Sometimes batteries are not wired in the proper sequence. A new RV owner will often connect the batteries in series or parallel but run both positive and negative connections off one battery. This will limit available power and not adequately charge all the batteries in the battery bank. Over time, this can result in irreparable damage to the RV batteries.
When using multiple batteries, it’s important to have all the positives connected to one battery and all the negatives connected to the battery furthest from the first. In effect, this creates a single large battery with maximum available power and optimal charging capabilities.
Avoiding Battery Charging Pitfalls
Overcharging your RV batteries can result in severe water loss, plate corrosion, and eventual failure. Newer ‘3–stage’ RV converter chargers help prevent battery gassing, water loss, and battery overcharging.
Undercharging can also cause significant issues. A simple way to reduce the impact of undercharging is to recharge your batteries often. For example, if you discharge your battery to 50% (then recharge), it will last up to twice as long compared to discharging it to 20%.
Adding a solar panel and a charge controller to your RV can help mitigate overcharging and undercharging issues. Solar power delivers a slow charge to your batteries — perfect for optimal performance and battery health. Conducting routine maintenance and using a solar solution to frequently recharge your batteries can dramatically extend the life of your RV batteries.
Power Inverters — What You Need to Know
While RV batteries typically provide 12 volt DC power, many appliances RV operators require 120 volts AC (like in your home). Converting DC power to usable AC power is the primary role of the RV power inverter.
There are two types of inverters — modified sine wave and pure sine wave.Modified sine inverters, while more affordable, use a basic form of technology that supplies power in an erratic fashion, with more peaks and ebbs in the flow.
Pure sine inverters provide ‘clean’ power very similar to what you receive in your home from your utility provider. Many modern appliances (including microwaves) and electronic devices are susceptible to power fluctuations and won’t operate optimally with power from a modified sine inverter.
Opting for a pure sine inverter will ensure you always get the best performance and life expectancy from your appliances and electronics.
Choosing an Inverter — Buying Tips
You should purchase your inverter from a company with a proven track record and reliable customer support. Your inverter should have a full range of safety certifications (such as CSA and UL) to ensure safe operation within your RV.
More elaborate converters also allow you to charge your batteries when you’re plugged into shore power or running a generator. Some even enable you to ‘pass through’ AC directly to your appliances when you’re plugged into shore power or to draw shore power and battery power at the same time.
Sizing Your Inverter
It’s important to properly size your inverter to ensure your appliances and devices run optimally. Appliances like microwaves and air conditions have ‘surge power’ requirements — up to 3x their rated power when starting up. You’re RV provider or your authorized solar dealer can help you determine the best inverter size for your requirements.
Inverter Installation and Operation Tips
Inverter location. You should install your power inverter as close as possible to the DC battery bank. This will minimize any power loss between the two.
Wire gauge. Larger capacity inverters require larger gauge wire connections to the battery bank. Small inverters (1,000 watts and under) can use four gauge wire, while a 3,000–watt converter requires 0 gauge connectors. Using incorrectly–sized connectors will limit the available power and performance of your inverter.
Fuses. It’s critical to install a fuse for the inverter. This can
prevent equipment damage or even a fire in the event of a short circuit or inverter failure. Fuses are sized according to inverter size — for example, a 110 amp fuse for a 1,000–watt inverter and a 400 amp fuse for a 3,000–watt unit.
power devices, shutting the inverter off will eliminate any parasitic
power draw from the inverter.
Charge Controllers — Getting the Most From Your Batteries
Charge controllers regulate the voltage and current coming from the solar panels to the battery, preserving battery life by preventing batteries from overcharging.
When RV batteries are low, the controller provides a full flow of current from the solar panels to replenish the battery banks. As the batteries achieve a 100% charge, the controller limits the current flowing from the solar panels to the batteries.
Pulse Width Modulated (PWM) controllers will shut off solar current when your battery is full and control the current flowing from the solar panels and battery for better ‘trickle charging.’
More sophisticated Maximum Power Point Tracking (MPPT) controllers are up to 30% more efficient than PWM controllers and provide even more control. The high cost of MPPT controllers, however, remains prohibitive. A top–quality PWM controller is recommended for almost all RV applications.
Installing Your Solar Controller
Most solar kits come with 25 feet of positive (red) and negative (black) wire. These wires feed from the roof panels down into the RV and connect to the solar controller. Depending on the RV size and where you choose to mount the controller, you may need to add additional wire lengths.
Installing the controller on an RV prewired for solar is very straightforward. There will be a cable entry plate installed on the roof and existing wires running from the roof to the predetermined controller location. Inside the trailer, a decal indicates where to mount the controller, with the wires already in place behind it. Simply use the decal as a template, cut around it, and attach the wires.
All About Power Converters and Transfer Switches
Power Converters
In RV applications, the power converter (also known as a battery charger) takes AC power (typically from a generator or shore power) and converts it to DC power used to charge the RV batteries. The best converters provide high throughput and shorten battery charging times, reducing shore power charges and saving generator fuel.
Buying Tips
Converters are available in different amperage output ratings — usually from 20 to 100 amps. It’s important not to go too small — select a converter that meets both your current and potential future needs.
Many upgraded converters offer a multi–stage charging feature with an equalization mode for better charging and improved battery life. Some also incorporate temperature compensation circuitry to adjust charge rates based on temperature — a feature that also helps extend battery life.
When To Disable Your Power Converter
Once RV operators remove any external AC hookups (generator or shore power), they should also shut off the power converter. The simplest way is to turn off the converter breaker on the panel. Disabling the power converter eliminates any parasitic loop that may prematurely drain the
battery bank. Once the operator reconnects AC power, they’ll also need to reconnect the power converter.
Transfer Switches
Transfer switches automatically switch between two incoming AC power sources— for example, from shore power and your inverter. Separating AC power sources is critical for your safety and the protection of your electrical equipment.
Buying Tips
The biggest variable in choosing a transfer switch is your power consumption (watts and amps). Look for a high–quality automatic transfer switch that will accommodate your daily power requirements with room for growth.
6 WAYS TO IMPROVE THE PERFORMANCE OF YOUR RV SOLAR SYSTEM
Even with an efficient RV solar system, you can do several simple things to maximize your system’s overall performance and power output.
Unplug cellphone chargers and power adaptors. These
devices draw power even when not in use. Connecting all
chargers and adaptors to a single power bar means you won’t
need to unplug individual items to turn them off.
Use efficient lighting. Lights can drain considerable power from your battery bank. Replacing incandescent bulbs with high–efficiency LEDs can significantly reduce your power consumption. For example, you can run 25 equivalent 2–watt LED bulbs for the same power consumption as a single 50–watt incandescent bulb.
Install a central inverter switch. While some inverters incorporate power–save features, turning the inverter completely off when not in use is more efficient.
Use Propane For Your Refrigerator. Keeping your RV’s fridge cold takes a lot of power. A propane refrigerator will spare your batteries and reduce the load on your solar system.
Upgrade Your Personal Electronics. Newer electronics are generally more power–efficient than older models. For example, a netbook may consume 25 percent of the power of a full–sized laptop. It pays to read the specs of your devices and choose the most efficient models possible.
Consider Lithium Batteries. Lithium battery banks create a more flexible system, improving power output and recharging speed while reducing weight.
Help From the Experts
A Go–Power Solar Dealer Can Make All the Difference
components.